 Anyone who plans on spending any length of time wandering the halls of Photoshop should consider learning how Photoshop layer sets work.
 Layers are crucial to the entire mechanism of Photoshop design and enhancement.
The Photoshop “Layers” palette maintains a precise history of all your keystrokes… so you don’t have to remember anything.
Layers can be likened to your command post, so it behooves you to spend some time in there. Let’s take a brief look around right now.
Hmm, looks complicated, doesn’t it? Well, unlike a lot of other functions inside Photoshop, Layers really is pretty simple.
Basically, it isolates different sections or transformations so you can work on them without affecting the rest of the image.
Which really comes in handy when you find yourself up against the wall and need to start that particular enhancement over: just throw that layer away.
Your Photoshop Layers box will automatically create a new layer for you for some changes, but you can also create a new yourself.
On your top menu bar, click “Layer,” then “New.” You’ll see a brand new, empty layer appear inside your Layers box. Notice that it has been highlited and the “background,” or original, layer is not.
The highlighted layer is the active layer, meaning that’s the one you’re presently working on. To activate a different layer, simply click on it, and Photoshop highlights (activates) it for you.
Becoming aware of this one function is essential for successfully working in layers.
(Note: Photoshop CS2 lets you activate multiple layers.)
Once you have a few layers inside your Layers dialog box, try clicking the eyeballs next to each one.
You’ll see that in this way you can visually isolate layers so you can tell exactly what it is you’re working on.
At times, you will find yourself creating many, many layers for a single image. When that happens, it gets difficult to find the layer you want to affect.
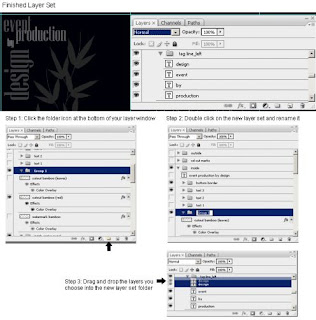
The solution to this problem lies in creating groups, or “layer sets.” Grouping layers allows you to place them into a folder. (In Photoshop CS, first link the layers, then choose “New Set from Linked” on the side menu of the Layers box.)
In Photoshop 7, you create a group by choosing each one, then clicking “Group with Previous” inside your Layer option in the top menu. Or you can click the tiny folder icon at the bottom of the Layers palette and drag the layers into that layer when it appears, then click the collapse arrow to the left of the set folder to hide the layers inside the folder.
If you want to get rid of the set folder later, highlight it, then click Layer, Delete, Set, then choose either “Set and Contents” or “Set Only.”
Some versions of Photoshop require you to choose your layers and then “Shift-Click” on the bottom folder icon to create a set folder. In Photoshop CS2, you can align layers by choosing View > Show > Smart Guides.
Like all the other fabulous Photoshop functions, Layers offers almost limitless ways to affect your photos and the way you maneuver around inside Photoshop itself.
Master The Basics Of Adobe Photoshop With My 2 Hour Easy To Use Photoshop Video Tutorial.
Please visit: ImtiazTips- Webmaster Articles & Website Design, Development Tutorial for more information about web design.
No comments:
Post a Comment